


 INTERNATIONAL SHIPPING

DIY Cork Hot Pads and Coasters
Homemade hot pads/trivets and coasters are the perfect housewarming gift or holiday gift. Reusing old wine corks is a great way to use something that would otherwise be considered trash and create the perfect gift for your favorite wine enthusiast. I chose to use our dura-grip furniture grippers to create a non-slip surface for the hot pads and coasters to rest on top of. The end result is a fun creation that anyone can enjoy for years to come!
Supplies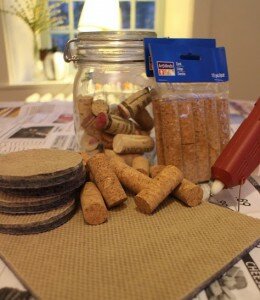
Hot Pad:
- One 7” Square DURA-GRIP Furniture Gripper
- 16 Wine Corks, cut in half lengthwise
Set of 4 Coasters:
- Four 3” Round DURA-GRIP Furniture Grippers
- 13 Wine Corks, Cut into 6 pieces widthwise
General:
- Hot Glue Gun
- Knife
- Cutting board
 Wine Cork Hot Pad
Start by plugging in and warming up your hot glue gun. Next, take 16 of your favorite wine corks and cut them in half lengthwise. While most wine corks should be the same length I would just make sure before you begin that all of them are generally the same length. I had one cork out of my 16 that was slightly shorter than the rest and it threw off the spacing a little, so I had to find a new cork to replace it. Once you have finished cutting all your wine corks in half, arrange the corks on the square DURA-GRIP to ensure everything lines up properly. I chose to alternate vertical and horizontal placement of the corks to create a unique pattern, but you can arrange the corks any way you like.
Once you have arranged the wine corks on your DURA-GRIP and are happy with the pattern  and spacing of the corks, it is time to start gluing. Glue the flat side of each cork to the furniture gripper. Remember to glue your corks to the tan side of the furniture gripper that way if there are any gaps in the pattern the tan will blend in with the color of the corks. Once you are all done gluing each cork to the furniture gripper, simply set aside to dry and start on your wine cork coasters!
Wine Cork Coasters
First, select 13 wine corks of similar widths. I used craft store bought wine corks because I used all my collected wine corks making the hot pad. The craft store wine corks actually worked quite well because they were all one uniform shape. Once you have selected your 13 wine corks it is time to start cutting them into 6 pieces widthwise. I had initially cut them into thirds but I realized that this would make my coasters way too thick and impractical so I cut each third in half. In total I ended up needing 76 thin circles to make a total of 4 coasters.
 Next, I arranged my coasters into the shape I wanted. I chose to create hexagonal shape because it was easier to create this shape and gave my coasters a unique design. To make one hexagon I glued together 1 row of 5 corks, 2 rows of 4 corks, and 2 rows of 3 corks. If you want to make your life easier, glue all the rows you need before gluing them all together. So for four coasters you would need 4 rows of 5 corks, 8 rows of 4 corks, and 8 rows of 3 corks. Once you have created all your rows you can start gluing each row together to form a hexagon. I started with the smallest row, the row of 3 corks, and worked my way in. The row of 5 corks should be your center row. For a more visual explanation of how to arrange each row, check out the D.I.Y video we’ve created for you!
Once you are done gluing together all four of your coasters you can attach them to your 3” round DURA-GRIP. I simply covered the tan side of the DURA-GRIP in hot glue and then placed it on the back of the cork coaster. Repeat this process with all four cork coasters and let dry. If you want to jazz up your coasters take ribbon and glue it around the perimeter of your DURA-GRIP. This covers up the edges of the DURA-GRIP and can be a fun, festive addition. Now you have two great cork items that can be used at home or given as gifts!


